
Shopify Schemas Unveiled: Your Blueprint to Structured Success

What are schemas in Shopify?
Last updated: 14/04/2024
This article was made to aid beginner Shopify developers.
Building out sections is a big part of Shopify development so understanding how to creating settings & how schemas work will put you ahead!
Section schemas are not to be confused with Structured Data for SEO - that is something totally different.
Key takeaways
- A Schema is a Shopify liquid tag that contains JSON inside
- Every section file needs a schema with a name and presets to allow it to be added in the customiser
- Themes are edited by the user changing settings (inputs) in the customiser
- Input settings are the different types of inputs (settings) you can have. There are 28 of them
- There are 3 types of settings: theme, section and block level
- For theme settings, data is stored in the settings_data.json file
- For sections and blocks, data from inputs are stored in the .json template file where the section is used
What we’ll cover
- What are schemas/settings?
- What are input settings
- The 3 types of settings
- Tools to use
What are schemas/settings?
Shopify is not a drag-and-drop builder. The only way to customise a Shopify store in the editor is by creating settings that users can then change to customise the section.
For example, you may see a color picker setting on some sections which allows you to customise the background color of a section.
A schema is a liquid tag: {% schema %} and {% endschema %}. The content inside of here is written in JSON format. You will most commonly see the schema tag inside a section folder.
These are the different attributes you can have inside of a schema:
This is where you set the name of a section. This can be different from the name of the file. This name is what store owners will see the section named as in the editor
This determines what HTML tag the section should be wrapped around. By default, it is a <div> element. If you would like you can to have a section or header or footer tag.
This allows you to add a custom class into the tag which wraps this section
Limit determines how many times this section can be used on a specific template. e.g. it can only be used 2 times on the homepage or collection page
This is where input settings go
You can create multiple types of blocks, each with it's own individual limits and settings
This puts a max ceiling on the number of total blocks that can be used in a section. For example, you can have 3 different types of blocks for a section. Let’s say you only want there to be 4 blocks maximum, this is where you would set that.
You will need to add a name attribute (matching the top-level schema name attribute) inside of this to allow any section to show up in the editor. Presets are also useful for defining a certain default number of blocks to be added in when a new section is added.
Very similar to presets. If the section is going to be statically rendered, then use this instead.
Here you can open up a language attribute and then have translation pairs for some of the input settings.
Limit a section to specific templates and section groups.
Prevent a section from being used in specific templates and section groups.
Schemas create settings which allows the store owners to modify the store. There are 3 types of settings:
- Theme settings
- Section settings
- Block settings
Let’s dive into more detail about them.
Theme Settings
Theme settings affect the entire theme & can be access at any time by using {{ setting.setting_id }}.
Theme settings are schemas created in the settings_schema.json file and values are saved in the settings_data.json file (Both in the Config folder of a theme). Inside both of these files, you won’t find a {% schema %} tag because the whole file will be wrapped in one.
The settings show up in the custom under the “Theme settings tab”, you will need to click on the paintbrush icon to access it.
Common theme settings you will see are fonts, colours & layout settings. These are perfect examples because those are things you want to stay consistent across a website but also allow a store owners to change that.
For a theme to work you will need to have this first setting. This schema won’t show up in the theme editor, it’s for internal use.

You will also notice that by default checkout settings are included in theme settings. This is because (unless you are using Shopify Plus or checkout apps), it isn’t possible to edit the checkout settings.
Section Settings
Section-level settings are created inside Liquid files in the Section folder. You will find every section file will have a schema section nearer the bottom of the file. It will be wrapped in {% schema %} and {% endschema %} tags with JSON inside.
Sections need to have the schema tag for them to be available to show up and be added in the theme editor.
Typical structure of a .liquid section file:
- CSS
- Liquid (if any)
- HTML
- JavaScript
- Schemas

The settings created will only apply to this particular section. For the store owners to access these settings they simply need to click on that particular section in the customiser.
Re-usable sections
As mentioned settings changed only apply to that particular section. But the problem comes when you have 2 of the exact same section on the page & CSS comes into play also.
Example: You have 2 image banner sections. The section has a Range input setting which allows users to change the width of the image. It would look something like this:
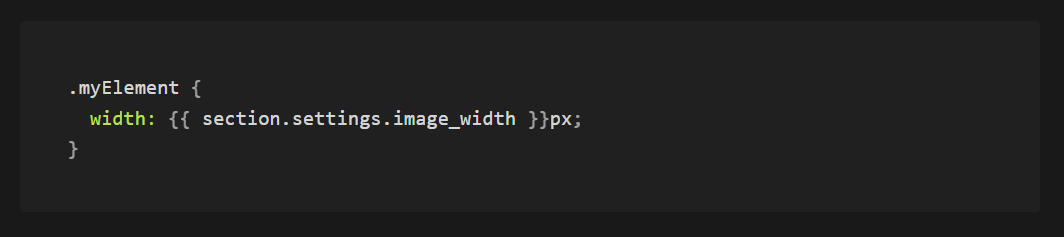
So now with 2 of these sections on the page, you will end up having 2 conflicting values! There are 2 ways around this:
Write CSS Inline
This means you’ll open up a style attribute on the HTML tag you want to target then put your dynamic CSS in there.

Use the Section ID approach
Shopify generates a numerical unique ID for every section created which you can access anywhere in the section using {{ section.id }}. Leaning in on this fact, it means we can target element inside this particular instance of the section.
Here is an example of this:
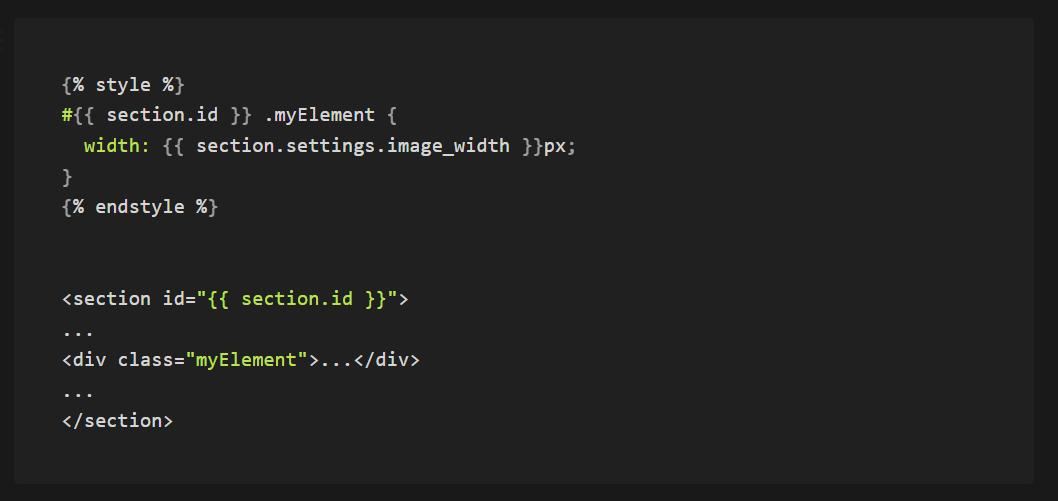
So we created a section wrapped with an id attribute of the unique section id. Then in our CSS we can simply target the element wrapped inside that unique instance of this section.
These 2 strategies explain how you can ensure sections remain re-useable!
Where are Section settings saved?
Section settings (as well as block settings) are stored in the template file they are used on.
For example, if you added an image banner section to the homepage the stored setting values would show up in the index.json file.
If you added that section to the product page as well, the stored values would show in the product.json file.
The structure of template files are very simple. There are 2 main parts:
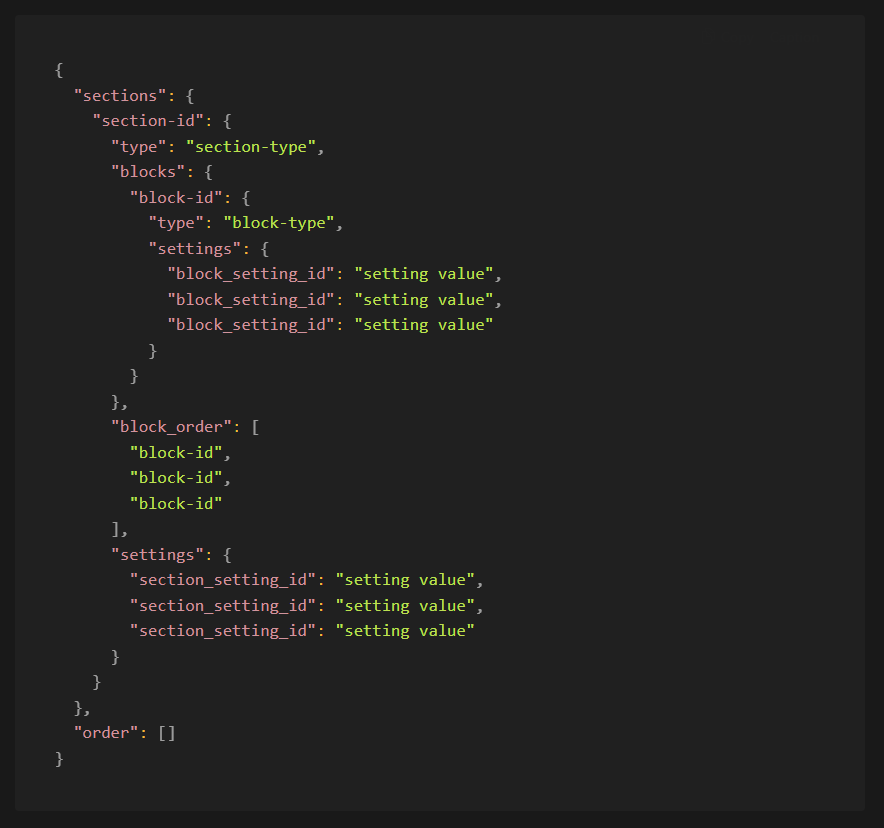
- Sections
This contains a multi-dimensional object of all the sections on that page. Each section object contains an ID of that section, type of that section, settings & values of that section, whether that section is being shown or not* and block objects.
Block objects are the blocks in that section. Block objects contain an ID of that block, type of that block, settings & values of that block and whether or not* that block will be shown
- Order
An array of the section ID
*Sections in the Shopify editor can be hidden, their values will still remain in this template file but the hidden section itself won’t be shown to shoppers.

Sections in this file will be referenced by their type or unique section ID. So you can see multiple of the same section with different settings applied.
Block settings
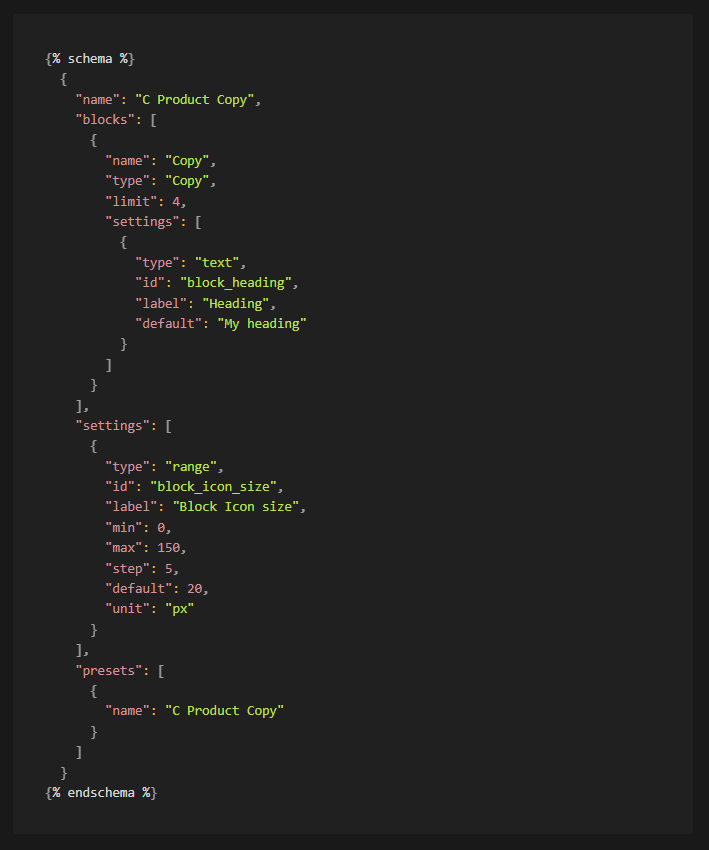
Block-level settings are also inside section files. In fact they will be put inside the existing {% schema %} tag for the section.
Blocks are created inside the {% schema %} tag “blocks”. After defining a name and type (required), you can also open up a settings array where the input settings for that particular block will show.
Remember you can define multiple different blocks here but each setting you put will only show its corresponding type of block.
As discussed earlier, block settings are saved in the same place as section settings - in the .json template file where the section is being used.
Block CSS
You can’t write dynamic block level as you would with a section. For example this code below wouldn’t work:
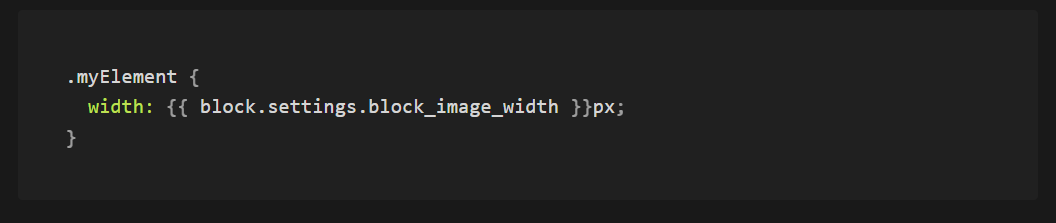
This is because the ‘block’ in {{ block.settings.block_image_width }} isn’t a variable. Inside a section file you have access to the ‘section’ variable since there is only 1 section. You can have multiple types of blocks so to have a ‘block’ variable for the entire section wouldn’t work.
To access a block you need to use this for loop:
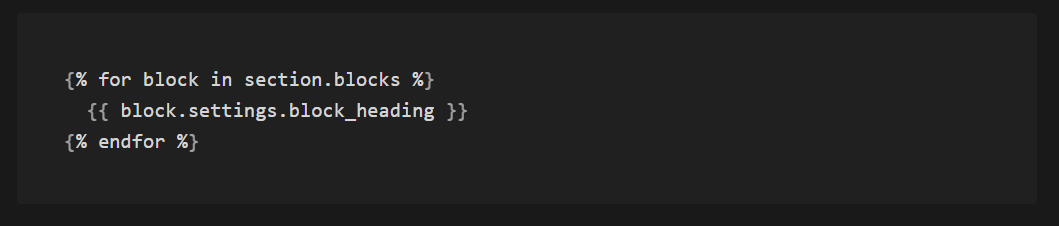
This will iterate through all of the blocks and then create the block variable inside that forloop.
If you only want to loop through a certain block, you can use this code:
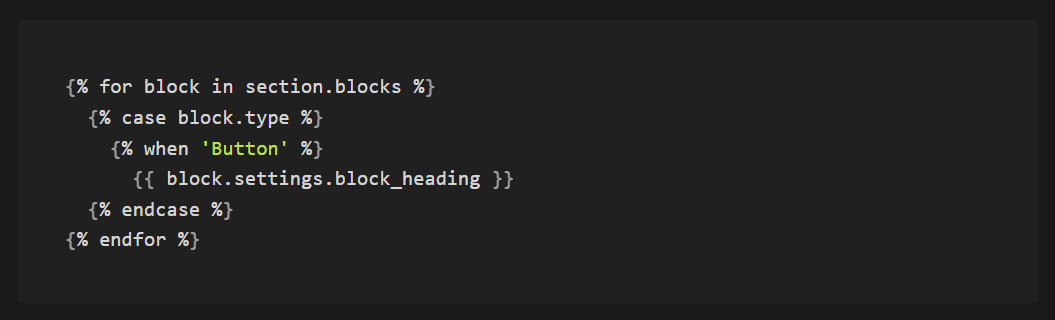
This will iterate through all the blocks but only target the block with the type of ‘Button’.
Now for adding you can add CSS for blocks into the {% style %} tag at the top of your page but it does get a little messy because since it’s a forloop you will end up with repeated styles & they still won’t be unique to each block.
Let’s say you want each block to have it’s own background and text color. Here’s the easiest way to do that:
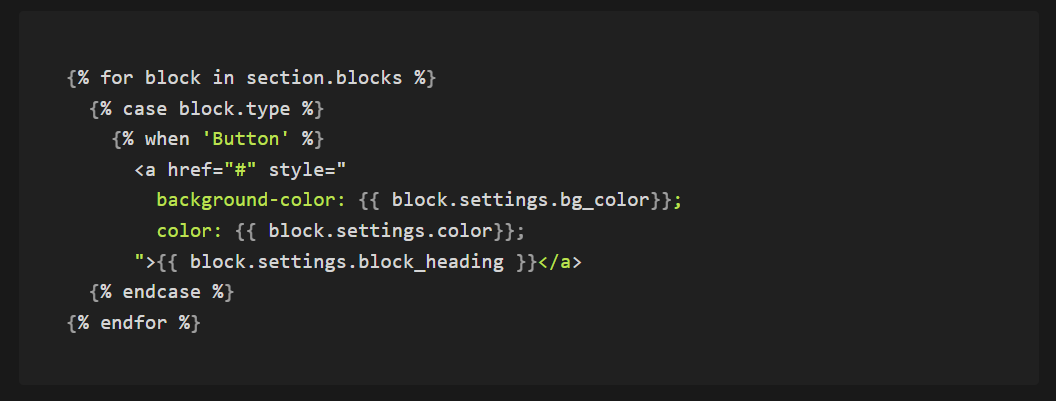
Using the inline style attribute just ensures each unique block gets its corresponding value.
What are input settings?
Input settings are inputs created for store owners to change the value of. Each schema needs to have be an input setting.
Every setting you see on a section is an input. What do I mean?
The setting to:
- change the text on a section is a text input
- change an image is an image/file input
- show the blog date or hide it is a checkbox input
- pick which collection to use in a featured collection section is a collection input
There are 28 types of input settings. Here they are:
- article
- blog
- checkbox*
- collection
- collection_list
- color
- color_background
- color_scheme
- color_schemes
- font_picker
- html
- image_picker
- inline_richtext
- link_list
- liquid
- number*
- page
- product
- product_list
- radio*
- range*
- richtext
- select*
- text*
- textarea*
- url
- video
- video_url
- These are basic input settings. The rest are specialized input settings
These are sidebar settings:
These are not inputs that the user can change. You can also create links in the editor too. These are made for organisational purposes really. And also for helping store owners
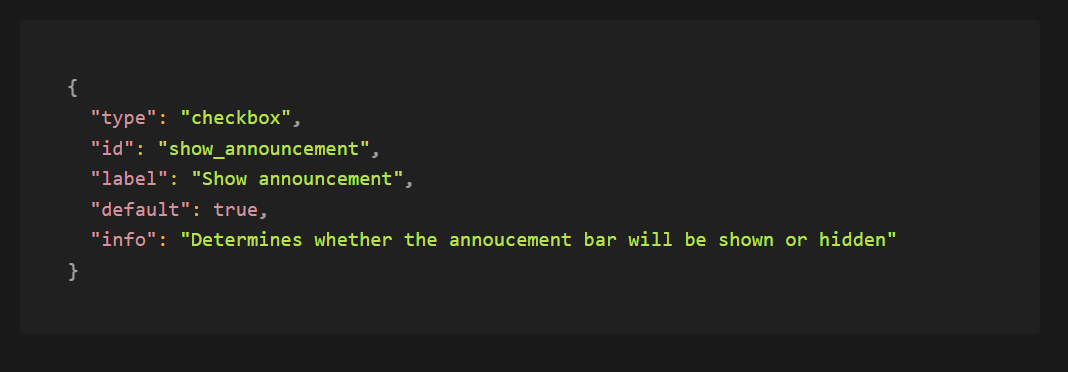
There are just the types! The other required attributes you need (to make a valid setting) are id and label. The unique ID will be used for reference and also for storing that value in the template file. The label is the text shown to store owners to describe what that setting does!

Hooray, you now have a setting! You will need to remember these 3 required values.
Type, id label.
Type, id, label.
Type, id, label.
Type, id, label.
Type, id, label.
Type, id, label… you get my point.
The other 2 standard attributes you can have are info and default. Info will just add some extra text below that setting in the editor.
The default attribute will make your life easier by adding in some (you guessed it) default values, so when a section gets added, it will automatically have some populated content and chosen settings.
Example
Shopify does a great job of styling each input to look great for users. You can have different types of input which achieve the same end result.
Let’s say you wanted an input for the user to choose whether they wanted 1, 2 or 3 columns on mobile for a particular section. You could use:
- A radio input. With the options being 1, 2 or 3
- A select input. With the options being 1, 2 or 3
- A range input. With the min, max and step (increment) set to 1, 3 and 1 respectively
- A number input
- A text input
You can achieve the same end result with all of these. The reason there are so many options is to allow you to choose the most user-friendly option.
Yes the text input could work but they could put in text instead of 1, 2 or 3
Yes the number input could work, but there’s no way of setting a min and max value.
Yes the range work but it’s looks a little odd to have a range input slider when there’s only 3 values to choose from
The select or radio input setting would be your best best in this example.
Conclusion
To get started with schemas, you will need to learn how JSON works unless you will get seriously frustrated when making syntax errors. We recommend using the JSON validator to check syntax errors.
Shopify dev docs should become your best friend when first starting. We recommend bookmarking this page on your browser for easy access.
Once you get the hang of things, the next step is to create your very own liquid file which contains all of the schemas you use. So when you’re figuring out what schemas you need, it becomes a simple copy & paste job.
This will save you hours of frustration from making silly syntax errors & speed up your development.
Frequently Asked Questions:
How do I get a Shopify section to show up in the Shopify editor?
To get a Shopify section available to be added in the customiser, you will need to have a schema with 1. a "name" attribute and 2. A "presets" attribute with a "name" attribute inside of it (which matches the top-level name attribute). If you are using Shopify section groups look out for the "enabled_on" or "disabled_on" attributes inside of schemas. Also double check whether there is a "limit" attribute which determines how many times a section can be used at all on a template.
Can Shopify blocks have settings?
Yes, Shopify blocks can have settings. Block level settings apply only that that particular type of block in that particular instance. Block setting values are stored with section settings values inside of the template file where the section is being used.
What does the Shopify presets schema do?
The "presets" attribute allows a section to be available to be added in the theme customiser. You can also set a default amount of blocks to be created when a section is added and even values inside of it.
We hope this article was useful for learning more about creating settings to make your theme customisable.

Read our article on Shopify Custom Theme Development for a guide on making your own custom theme.
If you are looking to build a custom theme, we'd love to be the team that helps you with that project. Feel free to contact us below!
—
We are Step Labs - a Webflow & Shopify web design & development agency! If you would like to build a beautiful and high-performing website, contact us at victor@steplabs.xyz.
Written By: Victor @ Step Labs
Stay up to date with our blog
Dive into our informative and engaging blog posts to stay informed on the latest trends in the Webflow & Shopify world as well on actionable tips to make your website work for you.


Contact us
We're only 1 email, call, message or meeting away. We'd be happy to help with your query. Book in a time on our calendar so we can speak.